GWTでチェックボックス・ラジオボタン
GWTでチェックボックスとラジオボタンを使ったアプリを作成する
内容
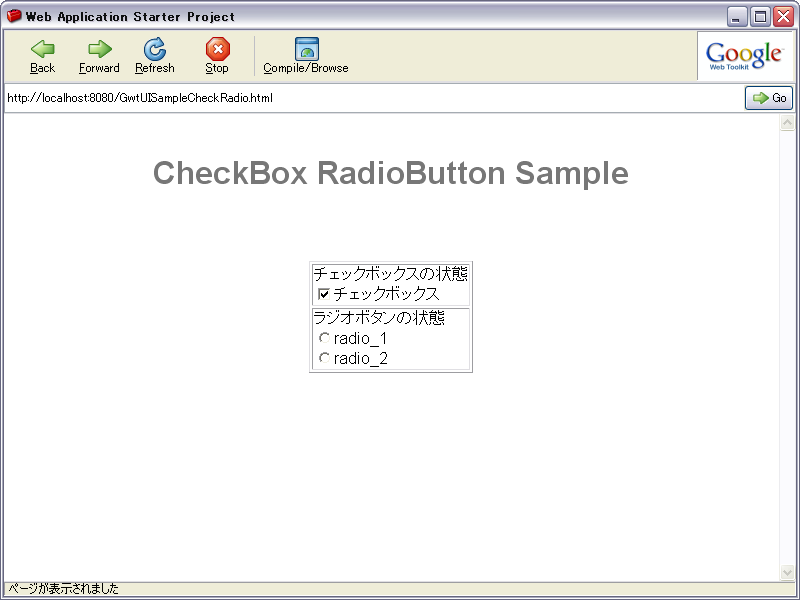
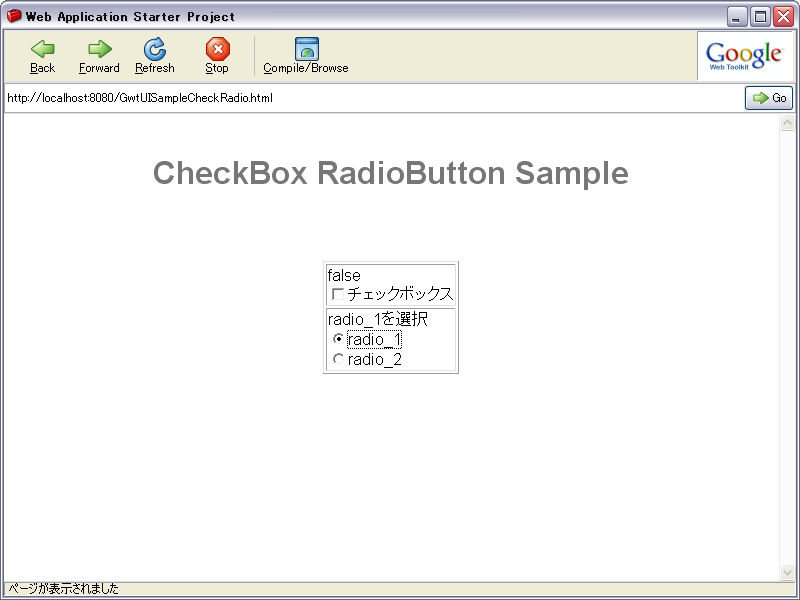
ラジオボタン・チェックボックスのチェック状態を取得し、それぞれの状態をラベルに表示する
プロジェクト概要
- プロジェクト名:GwtUISampleCheckRadio
- パッケージ:sample.checkradio
UI構成
■GwtUISampleCheckRadio
作成手順
- onModuleLoad()メソッドの定義以外を全て削除
- 各Widgetの宣言
- onModuleLoad()メソッド実装
- 各Widgetの初期化
- チェックボックスの処理追加
- イベントハンドラの実装
- チェック判定
- ラジオボタンの処理追加
- イベントハンドラの実装
- チェック判定
■onModuleLoad()メソッド チェックボックス処理
※1.6以降はイベント通知に「addValueChangeHandler」を使う。addClickListenerは使わない
※1.6以降はチェック判定にgetValue() を使う。isChecked()は使わない
		this.checkbox1.addValueChangeHandler(new ValueChangeHandler<Boolean>(){
			@Override
			public void onValueChange(ValueChangeEvent<Boolean> event) {
				lb_check.setText(event.getValue().toString());
			}
		});
■onModuleLoad()メソッド ラジオボタン処理
- ValueChangeHandlerの作成
- ValueChangeHandlerにイベント処理追加
- 各ラジオボタンにValueChangeHandlerを登録
どのWidgetのイベントなのかはevent.getSource()で確認できる
		//ラジオボタンイベント
		ValueChangeHandler<Boolean> radioValueChangeHandler = new ValueChangeHandler<Boolean>() {
			@Override
			public void onValueChange(ValueChangeEvent<Boolean> event) {
				lb_radio.setText(((RadioButton)event.getSource()).getText() + "を選択 ");
			}
		};
		this.radio_1.addValueChangeHandler(radioValueChangeHandler);
		this.radio_2.addValueChangeHandler(radioValueChangeHandler);
■実行結果


■ソース
■GwtUISampleCheckRadio
package sample.checkradio.client;

import com.google.gwt.core.client.EntryPoint;
import com.google.gwt.event.logical.shared.ValueChangeEvent;
import com.google.gwt.event.logical.shared.ValueChangeHandler;
import com.google.gwt.user.client.ui.CheckBox;
import com.google.gwt.user.client.ui.Label;
import com.google.gwt.user.client.ui.Panel;
import com.google.gwt.user.client.ui.RadioButton;
import com.google.gwt.user.client.ui.RootPanel;
import com.google.gwt.user.client.ui.VerticalPanel;

/**
 * Entry point classes define <code>onModuleLoad()</code>.
 */
public class GwtUISampleCheckRadio implements EntryPoint {
	private Panel panelCheckBox;
	private CheckBox checkbox1;
	private Label lb_check;

	private Panel panelRadio;
	private RadioButton radio_1;
	private RadioButton radio_2;
	private Label lb_radio;

	/**
	 * This is the entry point method.
	 */
	public void onModuleLoad() {

		this.panelCheckBox = new VerticalPanel();
		this.panelCheckBox.setTitle("チェックボックスのテスト");
		this.checkbox1 = new CheckBox("チェックボックス");
		this.checkbox1.setValue(true);
		this.lb_check = new Label("チェックボックスの状態");
		this.panelCheckBox.add(this.lb_check);
		this.panelCheckBox.add(this.checkbox1);


		this.panelRadio = new VerticalPanel();
		this.panelRadio.setTitle("ラジオボタンのテスト");
		this.lb_radio = new Label("ラジオボタンの状態");
		this.radio_1 = new RadioButton("groop", "radio_1");
		this.radio_2 = new RadioButton("groop", "radio_2");
		this.panelRadio.add(this.lb_radio);
		this.panelRadio.add(this.radio_1);
		this.panelRadio.add(this.radio_2);

		RootPanel.get("panelCheck").add(this.panelCheckBox);
		RootPanel.get("panelRadio").add(this.panelRadio);

		//チェックボックスイベント
		this.checkbox1.addValueChangeHandler(new ValueChangeHandler<Boolean>(){
			@Override
			public void onValueChange(ValueChangeEvent<Boolean> event) {
				lb_check.setText(event.getValue().toString());
			}
		});

		//ラジオボタンイベント
		ValueChangeHandler<Boolean> radioValueChangeHandler = new ValueChangeHandler<Boolean>() {
			@Override
			public void onValueChange(ValueChangeEvent<Boolean> event) {
				lb_radio.setText(((RadioButton)event.getSource()).getText() + "を選択 ");
			}
		};
		this.radio_1.addValueChangeHandler(radioValueChangeHandler);
		this.radio_2.addValueChangeHandler(radioValueChangeHandler);
	}
}
■GwtUISampleCheckRadio.html
<!DOCTYPE HTML PUBLIC "-//W3C//DTD HTML 4.01 Transitional//EN">
<!-- The HTML 4.01 Transitional DOCTYPE declaration-->
<!-- above set at the top of the file will set     -->
<!-- the browser's rendering engine into           -->
<!-- "Quirks Mode". Replacing this declaration     -->
<!-- with a "Standards Mode" doctype is supported, -->
<!-- but may lead to some differences in layout.   -->

<html>
  <head>
    <meta http-equiv="content-type" content="text/html; charset=UTF-8">

    <!--                                                               -->
    <!-- Consider inlining CSS to reduce the number of requested files -->
    <!--                                                               -->
    <link type="text/css" rel="stylesheet" href="GwtUISampleCheckRadio.css">

    <!--                                           -->
    <!-- Any title is fine                         -->
    <!--                                           -->
    <title>Web Application Starter Project</title>

    <!--                                           -->
    <!-- This script loads your compiled module.   -->
    <!-- If you add any GWT meta tags, they must   -->
    <!-- be added before this line.                -->
    <!--                                           -->
    <script type="text/javascript" language="javascript" src="gwtuisamplecheckradio/gwtuisamplecheckradio.nocache.js"></script>
  </head>

  <!--                                           -->
  <!-- The body can have arbitrary html, or      -->
  <!-- you can leave the body empty if you want  -->
  <!-- to create a completely dynamic UI.        -->
  <!--                                           -->
  <body>

    <!-- OPTIONAL: include this if you want history support -->
    <iframe src="javascript:''" id="__gwt_historyFrame" tabIndex='-1' style="position:absolute;width:0;height:0;border:0"></iframe>

    <h1>CheckBox RadioButton Sample</h1>

    <table align="center" border="1">
      <tr>
        <td id="panelCheck"></td>
      </tr>
      <tr>
        <td id="panelRadio"></td>
      </tr>
    </table>
  </body>
</html>